")

Introduction
Is your home filled with clutter? Do you feel stressed every time you enter a messy room? You’re not alone. Surveys show that nearly 54% of Americans feel overwhelmed by clutter, but many think professional organizing is too expensive.
Table of Contents
The good news is you don’t need to spend a lot on custom storage. With simple DIY storage projects, you can turn your living space into an organized oasis without spending much. This guide will help you with easy, beginner-friendly DIY storage solutions for a clean and organized home that anyone can create.
Whether you live in a small apartment or a large house, these creative storage ideas will help you reclaim your space, reduce stress, and make your home a place you love to come back to.
Why DIY Storage Solutions Are Perfect for Your Home
Building your own storage solutions has benefits beyond just saving money. When you create it yourself, you not only invest in your home but also develop useful skills. You end up with something that fits your needs perfectly.
Save Money While Getting Organized
Professional storage systems and custom built-ins can cost between $500 and $5,000 or more. In contrast, most DIY storage projects cost between $20 and $200 for materials. For example, a store-bought storage bench might cost $300 to $600, while a DIY version made from basic lumber and hardware costs about $75 to $100.
Due to inflation, many budget-conscious millennials and Gen Z homeowners are choosing DIY solutions. The savings add up quickly when you complete multiple projects around your home. Many DIY storage solutions can also be made with repurposed or upcycled materials, which can lower costs even more.
Customize Storage to Fit Your Exact Needs
Every home has unique challenges like awkward corners, unusual sizes, and specific style preferences. Mass-produced storage often doesn’t fit well. DIY storage solutions let you customize every detail, such as measurements, materials, and colors.
Need a storage unit that is exactly 27.5 inches wide to fit between your washer and wall? Build it yourself. Want storage that matches your decor perfectly? Choose your own stain or paint. This level of customization ensures your storage works well and looks intentional instead of makeshift.
Essential Tools and Materials for DIY Storage Projects
Before starting projects, let’s review the essentials. Don’t worry if you don’t have all the tools mentioned here—many can be borrowed, rented from hardware stores, or replaced with manual options.
Basic Tool Kit:

- Cordless drill with drill and driver bits
- Measuring tape (25-foot recommended)
- Level (2-foot or laser level)
- Circular saw or hand saw
- Sandpaper or electric sander (80, 120, and 220 grit)
- Pencil and carpenter’s square
- Safety glasses and work gloves
Common Materials:
- Pine or plywood boards (affordable and easy to work with)
- Wood screws and nails (various sizes)
- Wood glue
- Paint or stain and polyurethane
- Brackets and L-brackets
- Storage baskets or bins
- Hooks and hanging hardware
Where to Source Affordable Materials
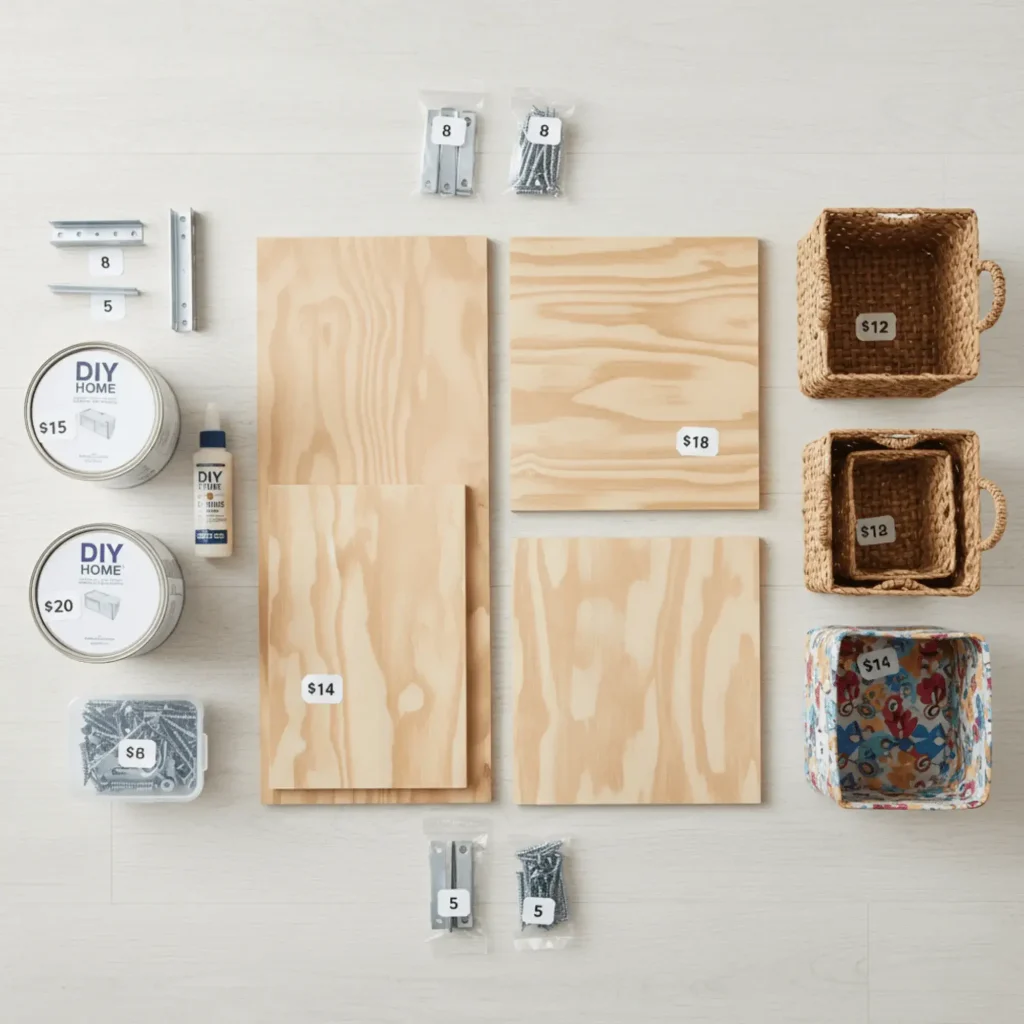
Smart shopping can cut your project costs by 30-50%. Start with these strategies:
Thrift Stores and Garage Sales: Look for solid wood furniture to repurpose, vintage crates, and baskets. A $15 old dresser can become stunning drawer organizers with minimal effort.
Habitat for Humanity ReStores: These nonprofit home improvement stores sell new and gently used furniture, building materials, and appliances at 50-90% off retail prices.
Facebook Marketplace and Craigslist: Search for free materials—people often give away wood, pallets, and storage items during moves or renovations.
Hardware Store Scrap Bins: Many lumber yards have discount sections for slightly warped or cut-off pieces, perfect for smaller projects.
Seasonal Sales: Stock up during Memorial Day, Labor Day, and Black Friday when hardware stores offer 20-40% discounts on lumber and supplies.
DIY Storage Solutions for Every Room
Let’s explore practical storage projects organized by room. Each section features several ideas that range from beginner to intermediate skill levels.
Living Room Storage Ideas
The living room often becomes a catch-all for items without designated homes. These solutions add storage while maintaining style. check out our guide on 15 clever home organization ideas for every room.
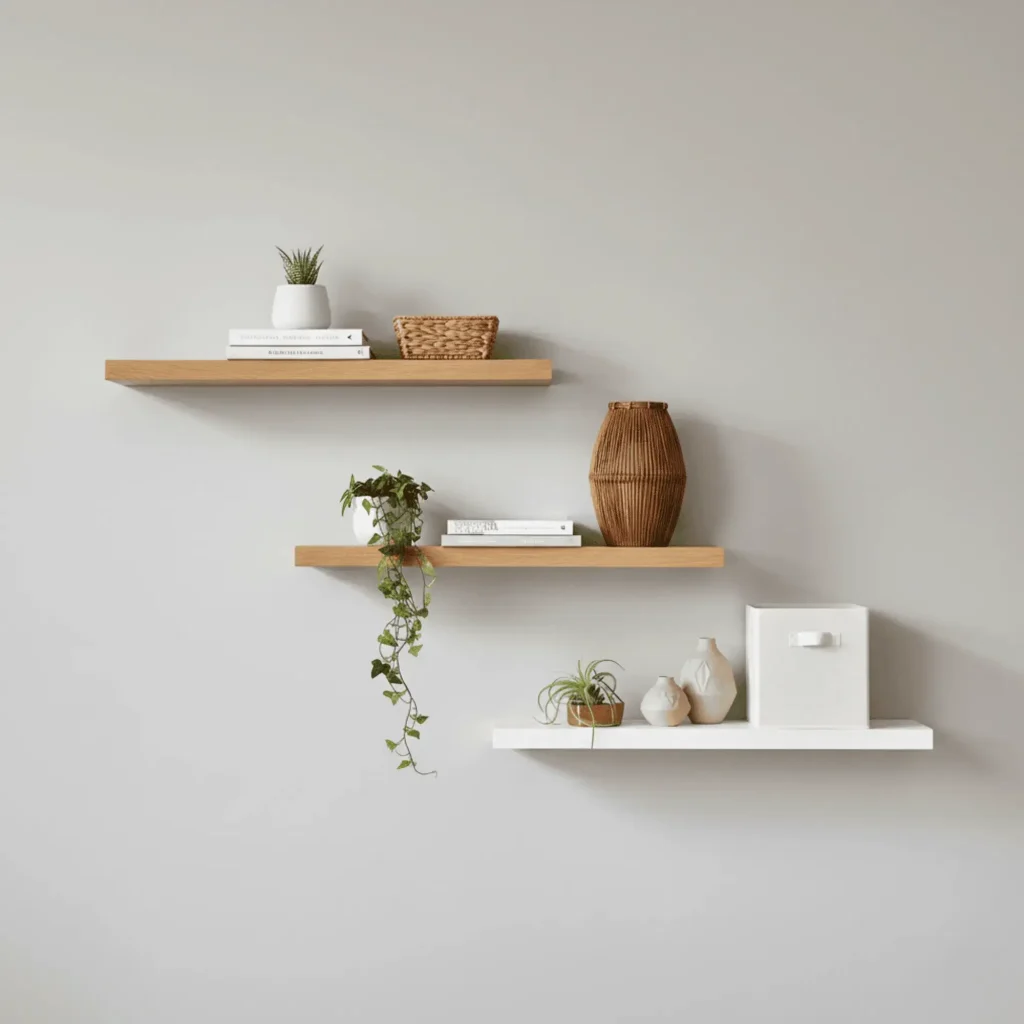
Floating Shelves Tutorial: Floating shelves create display space without visual bulk. Cut shelves from 1×10 or 1×12 pine boards to your desired length. Sand all edges smooth and apply a finish. Install heavy-duty floating shelf brackets into wall studs, then slide the shelf over the brackets. These work beautifully for books, plants, or decorative storage baskets. Cost per shelf: approximately $15-30.
Ottoman with Hidden Storage: Transform any sturdy wooden crate or build a simple box frame from plywood. Add a hinged lid, stuff with foam and batting, then cover with fabric using a staple gun. This creates a comfortable footrest with hidden storage for blankets, magazines, or toys. Perfect for small apartments where every piece must multitask.

Cable Management Solutions: Tame the tangle of charging cables and entertainment system wires with a simple cable box. Use a decorative wooden box or create one from scrap wood, drilling holes in the back for cable entry and exit. Mount a power strip inside and organize cables with velcro ties.
Magazine Rack from Repurposed Materials: Create a stylish wall-mounted magazine holder using leather straps and a wooden dowel, or repurpose vintage wooden crates as tabletop organizers. These add character while keeping reading materials accessible but contained.
Bedroom Organization Projects
Your bedroom should be a peaceful retreat, not a cluttered stress zone. These storage solutions maximize space while maintaining serenity.
Under-Bed Rolling Storage: Build shallow rolling drawers that slide beneath your bed using plywood and caster wheels. Measure your bed’s clearance height (usually 6-12 inches) and build boxes 2 inches shorter. Add rope handles for easy pulling. These are ideal for storing seasonal clothing, extra bedding, or shoes. Each drawer costs approximately $25-40 in materials.

Closet Dividers and Organizers: Double your closet’s capacity with DIY shelf dividers made from thin plywood or acrylic sheets. Create custom compartments for folded clothes, preventing stacks from toppling. Add a second hanging rod below existing ones using a chain and S-hooks for shorter items like shirts and pants. see our minimalist closet organization tips that actually work.

Nightstand with Built-In Compartments: Build a simple cube nightstand with an open shelf below and a hidden drawer or lift-top storage. Use 3/4-inch plywood cut to size, pocket screws for assembly, and add legs or casters. Internal dimensions can accommodate specific items like CPAP machines, books, or electronics.
Jewelry Organizer Wall: Mount a decorative picture frame with mesh or chicken wire backing. Spray paint the frame in your desired color, then use small hooks or simply hang earrings through the mesh. Add small cup hooks below for necklaces. This keeps jewelry visible, untangled, and functions as wall art.
Kitchen Storage Hacks
Kitchens demand efficient storage for items of all shapes and sizes. These solutions tackle common kitchen chaos.
Pull-Out Pantry Shelves: Install sliding shelves in deep cabinets so items don’t get lost in the back. Purchase heavy-duty drawer slides rated for your shelf weight, mount them to cabinet sides, then attach plywood shelves. This simple upgrade transforms frustrating cabinets into functional storage. Cost per shelf: approximately $20-35.

Pot Lid Organizer: Use tension rods installed vertically inside a cabinet to create slots for pot lids. Alternatively, mount a wire magazine rack inside a cabinet door for lid storage. Both solutions keep lids accessible without taking up valuable shelf space.
Spice Rack from Wooden Crates: Mount small wooden crates or build shallow boxes on inside cabinet doors or open wall space. Arrange spice jars facing forward for easy identification. For a magnetic alternative, attach small magnets to metal spice tins and mount them on a metal sheet on your wall or inside a cabinet door.

Under-Sink Organization System: Maximize awkward under-sink space with a tension rod for hanging spray bottles, stacking shelves for supplies, and a small caddy for sponges and brushes. Use waterproof bins to contain items and protect against potential leaks.
Bathroom Storage Solutions
Bathrooms, especially in older homes or apartments, often lack sufficient storage. These creative solutions add capacity without requiring renovation.explore our minimalist hacks for organizing small spaces.
Over-Toilet Shelving Unit: Build a simple ladder-style shelf that frames your toilet, adding storage without taking floor space. Use 1×6 boards for shelves and 1x4s for the frame. Sand, paint, or stain, then secure to wall studs for stability. This provides space for towels, toiletries, and decorative items. Total cost: approximately $40-60.

Mason Jar Organizers: Mount mason jar lids to the underside of shelves or medicine cabinets, then screw jars into lids. These hold cotton balls, Q-tips, bath salts, and other small items while keeping counters clear. The transparent jars make finding items easy.

Towel Ladder Tutorial: Create a decorative towel holder using a 2×2 or 2×3 lumber. Cut two 6-foot vertical pieces and several 18-24-inch crosspieces. Assemble with wood screws at your desired spacing, sand smooth, and finish with stain or paint. Lean against the wall for an instant, towel rack with rustic charm.
Medicine Cabinet Organizer: Add small tension rods inside medicine cabinets to create additional shelving for flat items like bandage boxes. Use small magnetic containers on the inside of metal cabinet doors for bobby pins and small items.
Home Office and Workspace
With remote work becoming standard, organized home offices are essential for productivity and work-life balance.
Desktop Organizer with Compartments: Build a custom desktop organizer sized to your exact needs using 1/4-inch plywood or reclaimed wood. Create compartments for pens, notepads, charging cables, and supplies. Add a small drawer for hidden storage. Finish with felt on the bottom to protect desk surfaces.
Wall-Mounted File System: Create a vertical filing system using wall-mounted magazine holders, wall pockets, or DIY boxes labeled by category. This keeps important papers visible and accessible while freeing up desk space. Use color-coding for quick identification.
Cable Management Box: Hide power strips and excess cables in a decorative box with holes drilled for cable routing. A simple wooden box, plastic container, or even a modified bread box works perfectly. This single solution eliminates visual clutter from multiple charging stations.
Pegboard Organization Wall: Mount a large pegboard above your desk and customize it with hooks, small shelves, and baskets. Paint it to match your decor. This adaptable system grows with your needs—simply rearrange hooks as your storage requirements change. Pegboard costs approximately $15-25 for a 4×4-foot sheet.

Step-by-Step Tutorial: Building a Multi-Purpose Storage Bench
This intermediate-level project creates attractive and functional furniture ideal for entryways, mudrooms, or at the ends of beds. The finished bench offers both seating and hidden storage.
Materials Needed:
- Two 8-foot 1×12 pine boards (sides and bottom)
- One 6-foot 1×12 pine board (front and back)
- One 4-foot 1×14 pine board (top)
- Four 4-inch furniture legs with mounting plates
- Piano hinge (length of bench minus 2 inches)
- 1.5-inch wood screws
- Wood glue
- Sandpaper (80, 120, 220 grit)
- Paint or stain and polyurethane
- Safety latch (optional, for cushioned top)
Tools Required:
- Circular saw, or miter saw
- Drill with bits
- Measuring tape
- Pencil
- Square
- Sander or sandpaper block
- Paintbrush or cloth for finish
Instructions:
Step 1: Cut All Pieces. Cut pieces according to your desired bench length (36-48 inches is standard). For a 42-inch bench: two 42-inch pieces for front and back, two 12-inch pieces for sides, one 42×12-inch bottom piece, and one 44×14-inch top piece. Cut edges must be square for proper assembly.
Step 2: Create Side Panels and Sand all pieces starting with 80-grit, progressing to 220-grit for smooth surfaces. Apply wood glue to the edges where the sides meet the front and back pieces. Secure with 1.5-inch screws pre-drilled to prevent splitting (3 screws per corner). Use a square to ensure 90-degree angles.
Step 3: Attach Bottom Once the frame is assembled and the glue has dried for at least an hour, apply glue to the bottom edges of the frame. Position the bottom piece and secure it with screws every 6 inches around the perimeter. This creates your storage cavity.
Step 4: Install Legs. Flip the bench upside down and attach furniture legs using mounting plates and screws provided. Position legs 2 inches in from each corner for stability and visual appeal.
Step 5: Attach Hinged Top Position the piano hinge along the back edge of your storage box. Secure one side of the hinge to the back panel, then attach the top piece to the other side of the hinge. Test that it opens and closes smoothly. Add a safety latch if desired.
Step 6: Apply Finish. Apply your chosen stain or paint following the manufacturer’s directions. For durability, seal with 2-3 coats of polyurethane, sanding lightly between coats with 220-grit sandpaper. Allow proper drying time between coats (typically 2-4 hours).
Step 7: Add Cushion (Optional) Cut foam to the top dimensions, cover with fabric secured underneath with a staple gun, and place on top. For a secure cushion, add velcro strips to both the cushion bottom and bench top.
Estimated Time: 4-6 hours over two days (including drying time), Estimated Cost: $75-110, depending on finish choices

Customization Ideas:
- Add dividers inside for organizing shoes or accessories
- Install hooks on the sides for bags or keys
- Paint in bold colors for kid-friendly spaces
- Use a weatherproof finish for outdoor use
Pro Tips for Successful DIY Storage Projects
Learning from experienced DIYers can save you time, money, and frustration. These tips ensure professional-looking results.
Measure Twice, Cut Once: This classic advice exists for good reason. Always double-check measurements before cutting, especially for expensive materials. Account for the width of your saw blade (the “kerf”) when marking cuts.
Start with Simple Projects: Don’t begin your DIY journey with an elaborate built-in entertainment center. Master basics like floating shelves or simple boxes before advancing to complex projects with multiple joints and precise measurements.
Prioritize Safety: Always wear safety glasses when cutting or drilling. Use hearing protection with loud power tools. Keep workspaces well-lit and clutter-free. Never bypass safety guards on tools. Work gloves protect against splinters, but remove them when operating power tools to prevent catching.
Pre-Drill Screw Holes: Prevent wood splitting by drilling pilot holes slightly smaller than screw diameter. This is especially important near board ends and when working with hardwoods.
Sand Between Finish Coats: For professional-looking painted or stained projects, lightly sand with 220-grit sandpaper between coats. This removes dust particles and creates better adhesion for subsequent coats.
Use Quality Hardware: Drawer slides, hinges, and mounting brackets aren’t places to skimp. Quality hardware operates smoothly and lasts for years, while cheap versions fail quickly and frustrate.
Test Fit Before Gluing: Dry fit all pieces together before applying glue. This allows you to identify problems and make adjustments before permanent assembly.
Allow Proper Drying Time: Rushing drying time leads to smudged finishes, weak joints, and disappointing results. Follow product recommendations for glue, paint, and sealant curing times.
Keep Tools Clean and Sharp: Dull saw blades and drill bits create rough cuts and require excessive force, increasing injury risk. Clean tools after each use and sharpen or replace blades regularly.
Common Mistakes to Avoid When Creating DIY Storage
Even experienced DIYers make mistakes. Knowing common pitfalls can help you avoid them.
Underestimating Space Requirements: Before building storage solutions, measure the items you want to store. Leave extra space for easy access; cramming items in makes storage hard to use. Make sure there is at least 2-3 inches of extra space beyond the item’s size.
Choosing Wrong Materials: Not all wood is the same. Pine is affordable and easy to work with for indoor projects, but it can dent easily. Plywood is strong and stable, making it good for shelves. Avoid using particle board for anything that needs to hold weight or will get wet. Think about what your project needs when choosing materials.
Skipping the Planning Phase: Jumping into cutting without a plan wastes materials and time. First, sketch your project and list all dimensions. Then, create a cutting list before making your first cut. For more complex projects, make a full-scale template out of cardboard.
Ignoring Weight Capacity: Shelving needs to support its weight. Use thick materials and space shelf supports properly. Standard 3/4-inch plywood can hold up to 30 inches apart when holding heavy items like books; lighter items can be spaced farther apart. Always secure heavy storage units to wall studs.
Not Considering Aesthetics: Choose storage solutions that match your home’s style. Pick finishes that go well with your existing furniture and decor. Sometimes, spending an extra $10 on paint can make your space look $100 better.
Forgetting About Access: Create storage that is easy to open, reach, and use every day. Deep cabinets without pull-out shelves can be frustrating. High shelves that require a ladder to access won’t be used. Think about how you will access the stored items in real-life situations.
Over-Complicating Designs: Simple solutions usually work best. Avoid adding extra complexity that makes projects take longer and harder without improving their function. Start with basic designs and add features once you have mastered the fundamentals.
Organizing Tips to Maximize Your New Storage Solutions
Building storage is only part of the process. Using smart organization helps keep your storage solutions working well over time.
Declutter Before Organizing: To get rid of clutter, start by eliminating what you don’t need. Go through your belongings and decide what you truly need, use, and love. Donate, sell, or throw away items that no longer help you. This will lower your storage needs and make it easier to organize.Read our guide on 10 minimalist storage ideas to declutter your home fast.
Use the 80/20 Rule: Keep storage at a maximum of 80% full. This gives you easy access and space for new items. When storage is too full, it becomes messy and hard to use.
Categorization Strategies: Group similar items together. In the kitchen, keep all baking supplies in one place and cooking utensils in another. In closets, first organize by clothing type, then by color. In home offices, sort supplies by their use. This system makes it easy to find items.
Implement Clear Labeling: Clearly label storage bins, baskets, and containers. You can use a label maker, printable labels, or neat handwritten tags. This helps everyone at home stay organized and find things quickly.
Follow the One In, One Out Rule: When you bring home new items, take out something similar that you no longer need. This stops clutter and keeps your storage organized.
Utilize Vertical Space: Store items vertically instead of spreading them out. Use shelf risers, hanging organizers, and wall-mounted solutions to make the most of your floor space.
Create Zones: Set up specific areas for different activities or items. Near entrances, create a landing zone for keys, bags, and mail. Organize a coffee station with all supplies in one place. These zones help make daily routines easier.
Maintain Regular Decluttering: Check your storage areas every three to six months. Look at what you are keeping and throw away items you haven’t used. This stops your storage from becoming cluttered.
Store Items Where You Use Them: Keep frequently used items in easy-to-reach places. Store items you rarely use in higher spaces like shelves or under the bed. This way of organizing is called “zone storage” and helps you be more efficient.

Conclusion & Call-to-Action
You can create easy DIY storage solutions for a tidy home without needing expert skills or expensive tools. With basic materials and simple techniques, you can turn messy areas into organized spaces that help reduce stress and improve daily life.
Start with a small project. Pick one that fixes your biggest problem—like a crowded bathroom, a messy entryway, or a disorganized home office. Gather your materials, set aside a weekend, and enjoy the process of building something useful yourself.
The projects you finish will save you money, give you custom solutions for your space, and teach you valuable skills for future projects. Most importantly, an organized home helps clear your mind, reduce stress, and give you more time for the things you enjoy.
Ready to get started? Get your free DIY Storage Project Planning Template to help you get started on your first project. It includes materials lists, measurements, and easy step-by-step checklists. Once you finish your projects, share them on social media with #DIYStorageSuccess. We love seeing your transformations!
Subscribe to our newsletter. Get weekly DIY tutorials, organization tips, and exclusive project plans sent to your inbox. Join thousands of homeowners who are creating organized and peaceful spaces.
Your journey to a clean and organized home starts with one project. Which one will you start with first?
External Links to Trusted Sources
- Better Homes & Gardens – Storage and Organization
- Trusted source for home and garden solutions with professional advice
FAQs
1. How much does it cost to create DIY storage solutions for my home?
Most DIY storage projects cost between $20 and $200 for materials. This is 70 to 90% cheaper than buying similar items in stores. Simple projects, like floating shelves, typically cost around $15 to $30. Larger items, such as storage benches, usually cost between $75 and $110. You can save even more by using materials you find at thrift stores or by getting free items from places like Facebook Marketplace.
2. Do I need advanced carpentry skills to build DIY storage?
Most projects in this guide are easy for beginners. You only need basic tools like a drill, saw, and measuring tape. Start with simple projects, such as floating shelves or under-bed storage boxes, to build your confidence. Follow the step-by-step instructions and remember to “measure twice, cut once” to help ensure your success, even if it’s your first time doing a DIY project.
3. How long does it take to complete a DIY storage project?
Simple projects, like floating shelves or storage bins, usually take 1 to 3 hours. Medium projects, such as closet organizers or bathroom shelving units, typically need 3 to 6 hours. Larger furniture pieces, like storage benches, take about 4 to 6 hours over two days, which includes time for finishes to dry. Most projects can be finished in a single weekend.